Roof Flashing Repair Guide (Tools, Process, & More In 6 Steps)
If you’ve ever spotted a mysterious water stain on your ceiling or noticed damp spots in your attic after heavy rain, the culprit could be failing flashing. Roof flashing is one of the most critical yet overlooked parts of your roofing system. When it starts to deteriorate or pull away, leaks can develop fast. Knowing how roof flashing repair works helps homeowners recognize early warning signs and take action before costly water damage sets in.
For long-lasting protection and leak prevention, working with an experienced roofing team is essential. Learn how professional roofing services handle flashing repairs efficiently and ensure every seam and joint is watertight.
In this guide, you’ll learn:
- What roof flashing is and why it matters for every home
- How to spot signs of flashing damage before leaks spread
- The six essential steps involved in repairing or replacing flashing
- Tools and materials professionals use for durable results
- Preventive tips to help you avoid future flashing failures
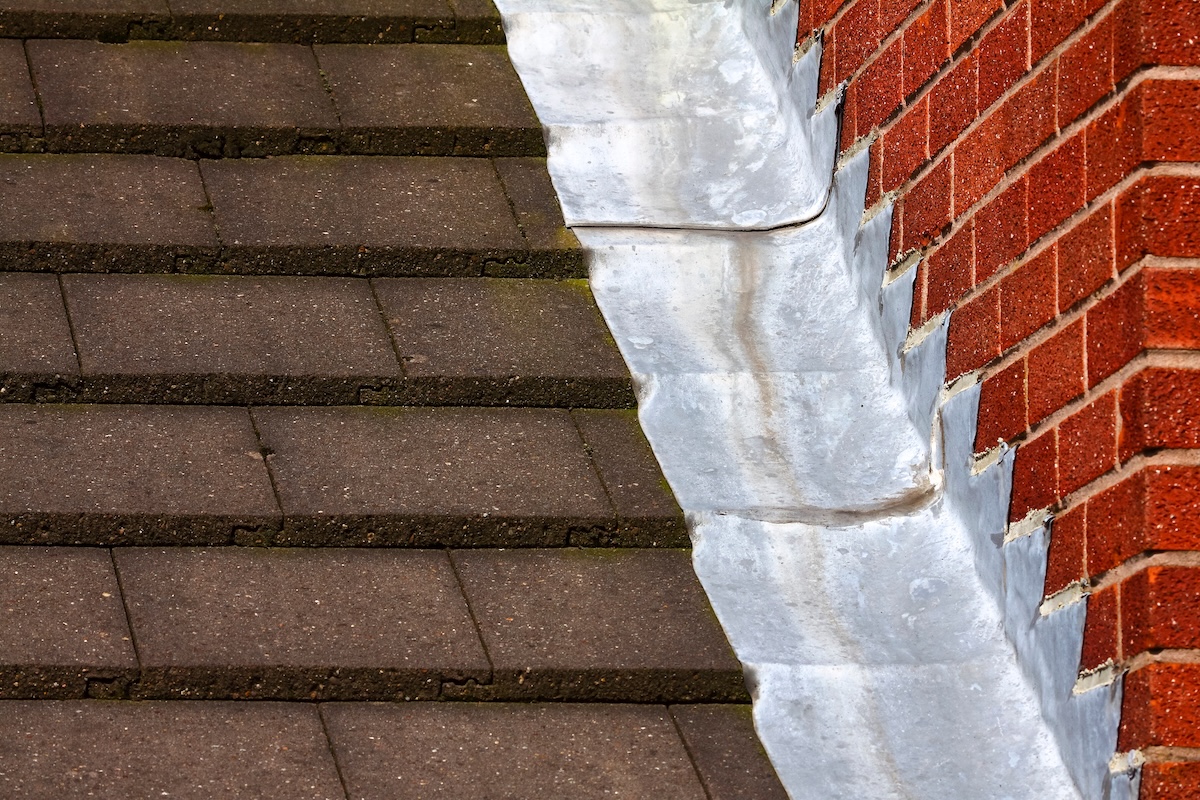
Why Roof Flashing Is So Important

Flashing may seem like a small part of your roofing system, but it plays a huge role in keeping your home dry. These thin pieces of metal—typically aluminum, galvanized steel, or copper—seal joints and transitions where the roof meets walls, chimneys, vents, and valleys. Without proper flashing, water can seep beneath shingles and cause damage to your decking, insulation, and interior walls.
Here’s why flashing repair deserves immediate attention:
- Prevents Water Leaks: Flashing redirects rainwater away from seams and edges, the most vulnerable parts of your roof.
- Protects Structural Integrity: When water seeps into your roof deck or attic, it can cause rot, mold, and long-term damage.
- Extends Roof Lifespan: Keeping flashing intact ensures shingles and underlayment perform as designed, delaying full roof replacement.
- Maintains Energy Efficiency: Water-damaged insulation loses effectiveness, leading to higher energy bills.
- Preserves Home Value: A well-maintained roof reassures buyers and prevents inspection issues if you decide to sell.
Homeowners in crown point and surrounding areas face seasonal weather that puts flashing to the test—from ice buildup in winter to wind-driven rain in summer—making regular inspection and timely repairs essential.
6 Steps to a Proper Roof Flashing Repair
Fixing roof flashing requires precision and the right materials. Whether it’s around a chimney, vent pipe, skylight, or valley, following a structured repair process ensures lasting results and leak protection.
1. Inspect and Identify the Problem Areas
A detailed inspection is always the first step. Roofers begin by examining flashing near common leak zones—around chimneys, vents, valleys, skylights, and roof-to-wall intersections.
Common signs of flashing damage include:
- Rust or corrosion on metal pieces
- Loose or missing nails and screws
- Cracks or gaps where flashing meets masonry
- Dried or missing sealant
- Water stains or soft spots under affected areas
Once the damaged areas are identified, professionals determine whether a repair or full flashing replacement is needed.
2. Remove Damaged or Loose Flashing
Before installing new flashing, roofers carefully remove old or corroded sections. They’ll also lift nearby shingles and underlayment to expose the flashing beneath.
This step may involve:
- Pulling out old nails and adhesive
- Cleaning debris and rust from the surrounding surface
- Checking the condition of underlying materials, such as decking and felt paper
If the decking is wet or rotted, it must be replaced before installing new flashing to prevent moisture from getting trapped.
3. Prepare the Surface for New Installation
A clean, smooth surface ensures proper adhesion and sealing. Roofers typically apply a waterproof underlayment or roofing cement beneath the flashing area to reinforce protection.
Preparation checklist:
- Remove dust and debris from the exposed surface
- Apply roofing sealant to seams and corners
- Fit new flashing pieces to ensure correct size and alignment
In areas like chimneys or sidewalls, step flashing is installed piece by piece to interlock with each shingle layer, creating a continuous moisture barrier.
4. Install New Flashing Pieces
This step involves measuring, cutting, and securing the new flashing with corrosion-resistant roofing nails or screws. Roofers follow manufacturer guidelines to ensure each piece overlaps properly.
Types of flashing installation include:
- Step Flashing: Used along sidewalls and dormers; layered between shingles for watertight coverage.
- Valley Flashing: Placed where two roof slopes meet; channels water away from the joint.
- Chimney Flashing: Combines base, step, and counter flashing for complete perimeter sealing.
- Vent Pipe Flashing: Fits snugly around vent bases to prevent leaks where pipes penetrate the roof.
All seams are sealed with a high-quality roofing sealant or soldered in place for metal roofs.
5. Reseal and Reinforce Key Areas
After installation, every joint, nail head, and edge receives a sealant layer to ensure maximum waterproofing. Roofers use silicone or polyurethane-based sealants for flexibility and long-term performance.
Final reinforcements often include:
- Applying an additional protective coating over seams
- Securing overlapping shingles back into place
- Checking that flashing transitions blend seamlessly with the existing roof
Proper sealing prevents future lifting and keeps wind-driven rain from finding its way underneath.
6. Inspect and Test the Repair
Once repairs are complete, a thorough inspection confirms the flashing is watertight. Roofers may use a light spray test or visual check during rainfall to ensure no moisture seeps through.
A final review includes checking for smooth overlaps, tight fasteners, and well-bonded sealant lines. Documenting the repair helps homeowners track maintenance history and warranty eligibility.
Common Areas That Require Flashing Repair

Flashing is used in several parts of the roof, each exposed to different conditions. Knowing where it’s most likely to fail helps you catch problems early before they become serious leaks.
Chimneys and Skylights
These areas face the greatest exposure to wind, temperature shifts, and heavy precipitation. Flashing around chimneys and skylights can loosen over time, creating small openings where water enters.
Watch for:
- Stains on interior walls near the chimney
- Drips around skylight frames during rain
- Rusted or separated metal flashing
Roof Valleys
Valleys collect the highest water volume during storms. Even minor cracks or debris buildup here can lead to fast leaks.
Preventive tip: Keep valleys clear of leaves and debris so water flows smoothly away.
Vent Pipes and Roof Penetrations
Any place where a pipe or vent passes through your roof needs flashing. Rubber boots or collars can deteriorate under UV exposure, causing leaks around the pipe base.
Typical fixes include:
- Replacing cracked rubber boots
- Resealing flashing bases with roofing cement
Sidewalls and Dormers
Where roofs meet vertical walls, step flashing ensures water doesn’t sneak behind siding or trim. When nails loosen or flashing shifts, these joints become vulnerable to leaks.
Tools and Materials Used in Roof Flashing Repairs
Flashing repair isn’t just about replacing metal—it requires specific tools and materials to ensure precise fitting and waterproof sealing.
Essential tools include:
- Hammer or drill (for securing nails or screws)
- Pry bar (to remove old flashing and nails)
- Tin snips or metal shears (for cutting flashing)
- Caulking gun (for applying sealant)
- Ladder and safety harness
Common materials used:
- Aluminum, galvanized steel, or copper flashing
- Roofing cement or asphalt sealant
- Underlayment membrane
- Corrosion-resistant nails or screws
- Silicone or polyurethane sealant
Professional contractors use high-grade materials tested for durability against moisture, corrosion, and temperature swings—ensuring a repair that lasts for years.
Comparing Flashing Repair vs. Replacement
Sometimes flashing can be patched or resealed, but in other cases, full replacement is the better choice. Here’s how to determine which option fits your situation.
| Situation | Repair Recommended | Replacement Recommended |
| Minor cracks or separated seams | ✔ | |
| Isolated rust or corrosion spots | ✔ | |
| Flashing under 10 years old | ✔ | |
| Widespread rust or bending | ✔ | |
| Flashing detached from masonry or walls | ✔ | |
| Ongoing leaks despite previous repairs | ✔ |
For older roofs or those nearing the end of their lifespan, replacing the flashing during a roof replacement ensures complete protection and saves on future repair costs. Homeowners in crown point and surrounding areas often choose full replacements when updating roofs to modern materials like architectural shingles or metal systems.
Preventing Future Flashing Damage

Routine maintenance can dramatically extend the lifespan of your flashing and roof system. Here are practical ways to prevent damage and avoid costly repairs:
- Schedule Annual Roof Inspections: A professional can catch loose nails, lifted flashing, and minor corrosion before they spread.
- Clean Debris Regularly: Keep gutters, valleys, and downspouts clear to prevent standing water.
- Check After Major Storms: High winds can lift flashing edges or tear away sealant, so inspect after heavy weather.
- Maintain Caulking and Sealants: Reapply as needed to ensure a watertight barrier.
- Trim Overhanging Branches: Falling limbs or constant rubbing can loosen flashing and shingles.
Staying proactive with inspections and minor maintenance will save money and extend the life of your entire roofing system.
Protect Your Roof from Hidden Leaks
Roof flashing may not get the same attention as shingles or gutters, but it’s one of the most vital elements of a watertight home. When flashing fails, leaks can form quickly and cause widespread damage before you notice a problem. Addressing issues early ensures long-term protection and peace of mind.
If you’ve noticed leaks, water stains, or suspect flashing damage in crown point and surrounding areas, contact us todayto schedule a professional inspection. Our experienced roofing team will locate problem areas, perform reliable roof flashing repair, and help keep your home protected from the elements year-round.